phpmyadmin.sh Centmin Mod Addon
Page last revision: Saturday July 25, 2015 (previous update Saturday May 15th, 2014)
- phpmyadmin.sh is currently in beta testing status. So please only try phpmyadmin.sh on a test Centmin Mod installed server which doesn't have any important sites etc. There is no 100% guarantee right now that phpmyadmin.sh will work fully.
- For beta testers, need to run phpmyadmin.sh and trigger the prior version detection routine to test that routine out first. Let me know if you don't get the below outlined detection message. Then next, edit phpmyadmin.sh and change VERSIONMINOR='04' to VERSIONMINOR='03' then proceed to run phpmyadmin.sh install.
- You can use a test server from DigitalOcean.com from $0.007/hr
Please, provide all beta testing feedback on the Centmin Mod Community forums specifically, under the Addons forum (left menu).
- Background
- Installation Prerequisites
- Installation
- Post-Installation
- Reset htaccess password
- Uninstall Script
- Accessing phpmyadmin
- phpmyadmin update script
- Troubleshooting Errors
- Important Notes
Background:
There are many ways to configure and install phpmyadmin from phpmyadmin.net documentation with Nginx. Some not as secure as other methods. It's one of reason I have yet to include it in Centmin Mod.
To be able to include phpmyadmin.sh auto installer as a Centmin Mod official Add On, it will have to be locked down tight:
- behind SSL and only accesible via https://
- password protected directory
- randomised directory install path unique to each Centmin Mod installation
- separate php-fpm pool with different user
- deny all access with only 127.0.0.1 and your ISP ip address allowed access
- auto updatable phpmyadmin
Installation:
You can use a test server from DigitalOcean.com from $0.007/hr
The following steps are required:
1. Ensure you're using PHP 7.1+ as phpmyadmin no longer supports PHP versions below PHP 7.1 and download latest version phpmyadmin.sh Addon script from here. I'd install it to addons directory in Centmin Mod
cd /usr/local/src/centminmod/addons
wget --no-check-certificate https://github.com/centminmod/phpmyadmin/raw/master/phpmyadmin.sh -O phpmyadmin.sh
To lower the risk of encounting 403 Access Denied errors, the script was updated with a STATICIP variable at top of the phpmyadmin.sh script. By default, it assumes you have a non-static IP address which changes frequently, so as to disable IP address restriced access to phpmyadmin directory with the setting STATICIP='n'.
If you have a fairly static IP address which doesn't change, then you can change variable to yes 'y' prior to installing and running phpmyadmin.sh STATICIP='y'.
  # If you have a fairly static IP address that doesn't change often
# set STATICIP='y'. Otherwise leave as STATICIP='n'
STATICIP='y'
Give script appropriate permissions via command:
chmod 0700 /full/path/to/where/you/downloaded/phpmyadmin.sh
i.e.
chmod 0700 /usr/local/src/centminmod/addons/phpmyadmin.sh
2. For Centmin Mod 1.2.3-eva2000.07 and older versions ONLY, add git required port 9418 to CSF Firewall /etc/csf/csf.conf. For Centmin Mod 1.2.3-eva2000.08+ and higher not needed as port 9418 is already added to CSF Firewall. To do this for Centmin Mod 1.2.3-eva2000.07 and older versions ONLY, append port 9418 to existing TCP_IN and TCP_OUT list of ports which are listed with comma separated format. This step is important otherwise you may get 404 Not Found errors.
i.e. for TCP_OUT
  # Allow outgoing TCP ports
TCP_OUT = "111,2049,1110,9418,20,21,22,25,53,80,110,113,443"
Then restart CSF Firewall via command:
csf -r
Double check CSF Firewall has allowed port 9418 via command:
csf -l | grep 9418
You should see output like below showing that 9418 has ACCEPT and allowed.
0     0 ACCEPT     tcp  --  !lo    *       0.0.0.0/0  0.0.0.0/0  state NEW tcp dpt:9418
1    48 ACCEPT     tcp  --  *      !lo     0.0.0.0/0  0.0.0.0/0  state NEW tcp dpt:9418
3. Run phpmyadmin.sh script via commands:
  cd /usr/local/src/centminmod/addons/
  ./phpmyadmin.sh install
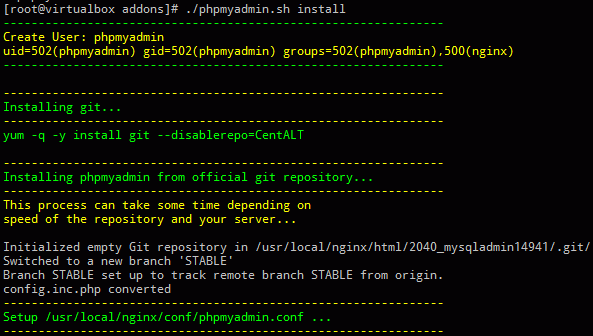
At the SSL Vhost setup step, you will need to generate a self-signed SSL certificate, just hit enter at each of the prompts to continue.
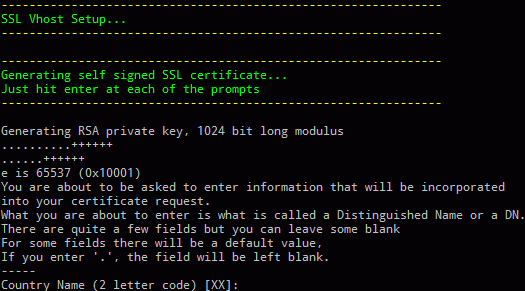
The installer, installs and updates phpmyadmin via phpmyadmin's official stable git repository. The install process via git has varying install times as github can be very slow at times and fast at other times. Install could take anywhere from 5 minutes to 45 minutes. Just something we'd have to live with to ensure auto updates and code maintenance are done to keep phpadmymin installation safe and secure.
Starting with phpmyadmin.sh 0.0.5 version, the PHP memory_limit is now dynamically set according to your server's specific memory availability at time of phpmyadmin installation. Free memory is determined by /proc/meminfo info (free mem + buffer + cached mem). Right now the dynamic memory_limit set to 4/9ths the real free memory detected on server.
For instance on test server:
Dynamically set PHP memory_limit based on available system memory...

Total Mem: 1500 MB
Real Free Mem: 1358 MB
Mem Limit: 603 MB
Within /usr/local/nginx/conf/phpfpmd/phpfpm_myadmin.conf
php_admin_value[memory_limit] = 603M
Post-Installation:
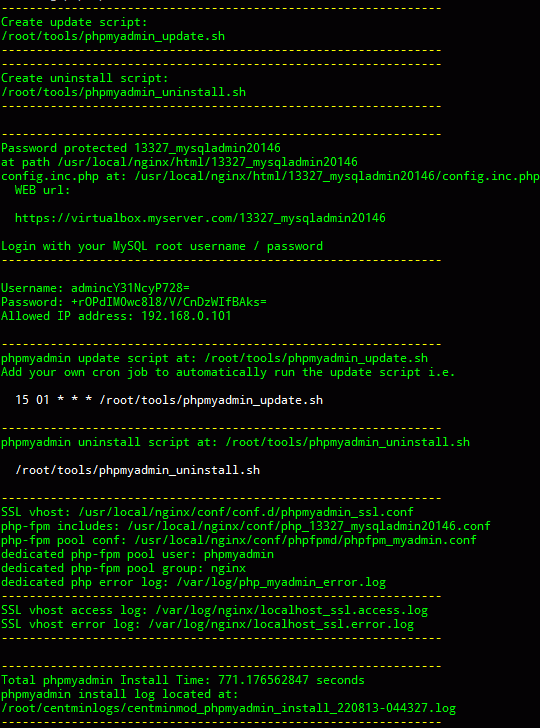
At end of installation, some information will be presented to you including:
- Full local path to phpmyadmin install directory and config.inc.php location.
- Web accessible url for phpadmin install directory unique to each Centmin Mod installation. This will be off your main server's Nginx vhost default hostname which you setup from step #1 of 'Getting Started' Guide.
- Password protected directory's username and password which are auto generated for you.
- The allowed IP address which script detected as your present login IP address.
- Location of phpmyadmin update script and example cronjob line you can add. This is located at /root/tools/phpmyadmin_update.sh
- Location of phpmyadmin uninstall script. This is located at /root/tools/phpmyadmin_uninstall.sh
- The Nginx SSL vhost entry defined specifically for phpmyadmin to run from https:// connections. This is located at /usr/local/nginx/conf/conf.d/phpmyadmin_ssl.conf
- Specific php-fpm includes file unique to each Centmin Mod installation.
- The php-fpm pool configuration file for dedicated assigned pool for just phpmyadmin. This is located at /usr/local/nginx/conf/phpfpmd/phpfpm_myadmin.conf
- The php-fpm dedicated pool's user and group designation.
- The php-fpm dedicated pool's error log at /var/log/php_myadmin_error.log.
- SSL Vhost access /var/log/nginx/localhost_ssl.access.log and error logs /var/log/nginx/localhost_ssl.error.log
- The total phpmyadmin installer's installation time in seconds
- The phpmyadmin.sh installer's log path which you can use to troubleshoot issues, or reference back to to jot down the above provided info. You can remove this log after saving or jotting down important info.
Reset htaccess password
Added to phpmyadmin.sh 0.0.6 version ability to reset htaccess password. Just run the script within SSH telnet:
  cd /usr/local/src/centminmod/addons/
  ./phpmyadmin.sh resetpwd
Resulting output will contain a new Username and Password for htaccess login.
Uninstall Script
A convenient uninstall script is created at time of initial install run of phpmyadmin.sh located at /root/tools/phpmyadmin_uninstall.sh. You can use this script to uninstall your phpmyadmin installation and re-run phpmyadmin.sh install again to reinstall. You will get a new unique phpmyadmin directory name, new log in details etc.
Just run the script within SSH telnet:
/root/tools/phpmyadmin_uninstall.sh
Accessing phpmyadmin:
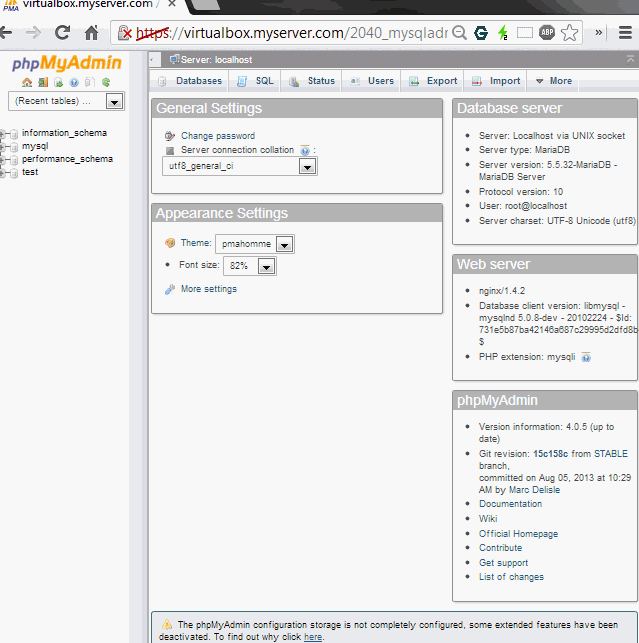
To access phpmyadmin installation, you enter into your browser address bar, the provided web accessible url for phpadmin install directory. For example:
https://virtualbox.myserver.com/2040_mysqladmin14941.
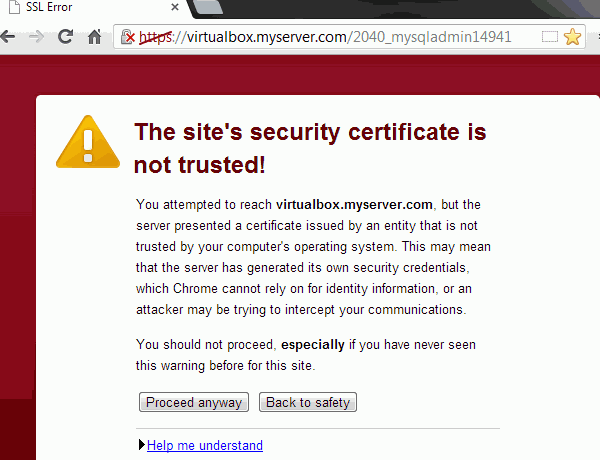
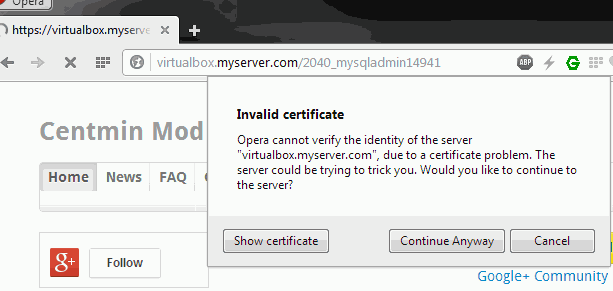
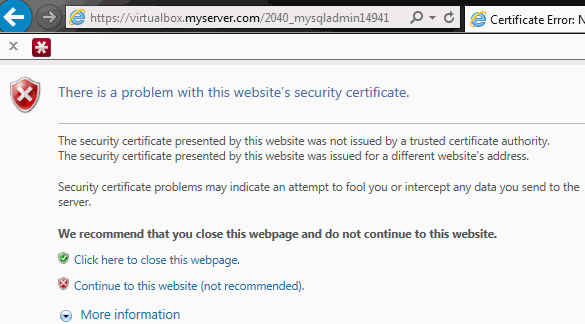
Notice that Google SPDY SSL is configured and enabled for better performance and that you need to access it via https:// and because the it's a self-signed generated SSL certificate, your browser will complain or warn you that the site's security certificate isn't trusted etc. That is okay, just click proceed or continue through to the web site anyway.
For Chrome:
For Opera 15:
For Internet Explorer:
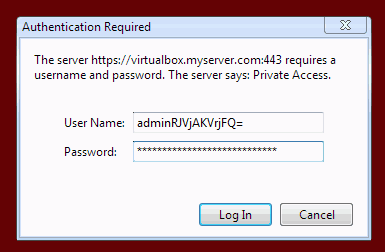
Next, you'll be prompted to access the password protected directory's username and password which was provided at end of installation above.
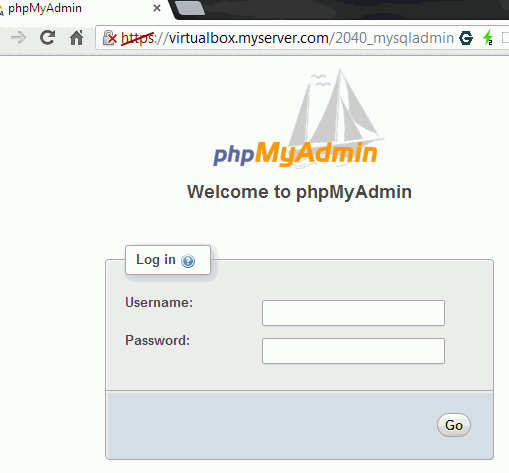
You'll then be able to log in with your MySQL root username and password.
phpmyadmin update script
phpmyadmin update script is installed at /root/tools/phpmyadmin_update.sh. You can run it manually or setup your own cron job to automatically run the update script i.e. to run every day at 1:15 AM.
15 01 * * * /root/tools/phpmyadmin_update.sh
After each update run, an update log is created at same location where all Centmin Mod menu logs are place at /root/centminlogs as per FAQ item #7.
 ls -lahrt /root/centminlogs
total 3.4M
root root 7.2K Aug  7 16:11 centminmod_1.2.3-eva2000.04_070813-160306_yuminstall_centos6.log
root root 3.4M Aug  7 16:34 centminmod_1.2.3-eva2000.04_070813-160306_install.log
root root 9.0K Aug 20 06:51 centminmod_200813-060958_phpmyadmin_install.log
root root  109 Aug 20 12:52 centminmod_phpmyadmin_update-200813-125240.log
Sample update log output:
cd /usr/local/nginx/html/2040_mysqladmin14941
git pull
Already up-to-date.

Total phpmyadmin Update Time: 2.429281307 seconds
Troubleshooting Errors
403 Access Denied
Most common error folks will encounter will be 403 Access Denied or Permission Denied errors. The reason is, the phpmyadmin.sh installer will take your current SSH session's IP address and allow that IP address in the /usr/local/nginx/conf/phpmyadmin_https.conf file which defines your settings specifically for the phpmyadmin unique install directory.
From the above example run, further below is a sample of what in the /usr/local/nginx/conf/phpmyadmin_https.conf file would look like. Ignore the commented out with front hash # line. The allow lines are specifically to tell Nginx server to only allow access for the following listed IP addresses. My test server is on local PC, so the detected IP address for me was 192.168.0.xxx. For most folks, the IP address listed will be your ISP IP address.
  location ^~ /22531_mysqladmin23762/ {
        #try_files $uri $uri/ /22531_mysqladmin23762/index.php?$args;
        include /usr/local/nginx/conf/php_22531_mysqladmin23762.conf;

        auth_basic      "Private Access";
        auth_basic_user_file  /usr/local/nginx/conf/htpassphpmyadmin;
        allow 127.0.0.1;
        allow 192.168.0.xxx;
        deny all;
}
This is where the common error can occur with 403 Access Denied when trying to access the phpmyadmin install directory within your browser. If your ISP has dynamic IP address, then it may change frequently. So you will need comment out (put a hash # in front) the 2 allow lines and deny all line to look like the below example. This will reduce the security of your phpmyadmin install somewhat as you are no longer restricting access to just your own IP address. Then again other control panels which offer phpmyadmin access don't usually restrict access based on IP address either, so you could say, security level falls to the same level as other control panels now.
  location ^~ /22531_mysqladmin23762/ {
        #try_files $uri $uri/ /22531_mysqladmin23762/index.php?$args;
        include /usr/local/nginx/conf/php_22531_mysqladmin23762.conf;

        auth_basic      "Private Access";
        auth_basic_user_file  /usr/local/nginx/conf/htpassphpmyadmin;
        #allow 127.0.0.1;
        #allow 192.168.0.xxx;
        #deny all;
}
The restart Nginx server for it to take effect:
service nginx restart
or command shortcut
ngxrestart
404 Not Found
Commonly would occur if you forget to do above step #5 properly and whitelist allow port 9418 in CSF Firewall for TCP_IN and TCP_OUT. Double check CSF Firewall has allowed port 9418 via command:
csf -l | grep 9418
Should so 2 lines showing 9418 port
0     0 ACCEPT     tcp  --  !lo    *       0.0.0.0/0  0.0.0.0/0  state NEW tcp dpt:9418
1    48 ACCEPT     tcp  --  *      !lo     0.0.0.0/0  0.0.0.0/0  state NEW tcp dpt:9418
If the port isn't whitelisted, git is unable to create the actual phpmyadmin directory = 404 not found
502 Gateway Time Out errors
Another common error is 502 / 500 Gateway Time Out errors when trying to export databases from phpmyadmin. As mentioned below in Important Notes section, phpmyadmin is not reliable for backing up or restoring large databases to begin with. It's more reliable to use mysqldump.
The usual suspects causing the problem are:
- The PHP memory_limit which will limit the size of database you can export.
- The PHP max_execution_time which limit how long the PHP script can run for.
The updated phpmyadmin.sh has error logging at /var/log/php_myadmin_error.log just for phpmyadmin installation and on 502 Gateway Time Out error export of a 365MB cummulative sized databases from phpmyadmin, you would get the following error:
PHP Fatal error: Allowed memory size of 134217728 bytes exhausted (tried to allocate 128983041 bytes) in /usr/local/nginx/html/9845_mysqladmin22802/export.php on line 379
The phpmyadmin instance has it's own dedicated php-fpm pool configuration file at /usr/local/nginx/conf/phpfpmd/phpfpm_myadmin.conf which defines the memory_limit and max_execution_time via the variables:
  php_admin_value[memory_limit] = 128M
  php_admin_value[max_execution_time] = 1800
After editing the file be sure to restart php-fpm service.
The restart php-fpm service for it to take effect:
service php-fpm restart
or command shortcut
fpmrestart
If you raise memory_limit from 128M to 256M and restart php-fpm service, you still would get the error when trying to backup and export via phpmyadmin 365MB worth of MySQL databases:
PHP Fatal error: Allowed memory size of 268435456 bytes exhausted (tried to allocate 263198721 bytes) in /usr/local/nginx/html/9845_mysqladmin22802/export.php on line 379
phpmyadmin config.inc.php (i.e. at /usr/local/nginx/html/9845_mysqladmin22802/config.inc.php or where your unique phpmyadmin directory is located) also has it's own defined memory limit and execution time limit which would need increasing as well:
  $cfg['ExecTimeLimit'] = '14400';
  $cfg['MemoryLimit'] = '256M';
For updated phpmyadmin.sh I have disabled that MemoryLimit:
$cfg['MemoryLimit'] = '0';
One work around to reduce the size of data PHP is trying to export to browser when exporting a database, is to specifically save the output file with compression as gzipped. That reduced my test database from 365MB in size to 145MB gzipped file and allowed exporting.
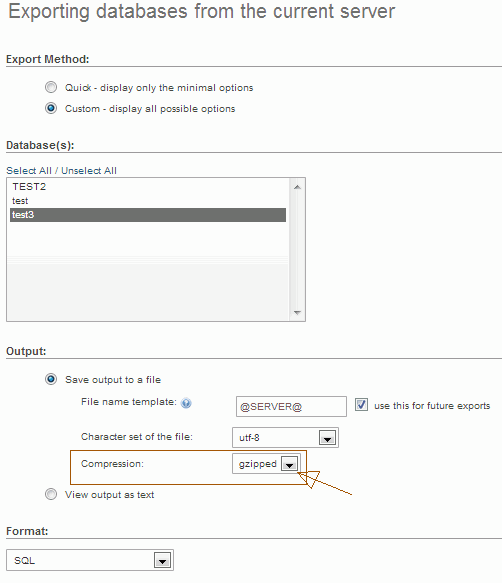
However, you see the limitation will eventually come down to the amount of physically installed memory you server has and the defined PHP memory_limit in /usr/local/nginx/conf/phpfpmd/phpfpm_myadmin.conf. Hence, why I strongly recommend MySQL database backups for very large MySQL databases be done via mysqldump instead.
Import Errors
If you try to import a MySQL database backup that is very large you may get error page and find in your my server hostname's error log at /var/log/nginx/localhost_ssl.error.log the following error message complaining that client body size was too large:
[error] 6783#0: *81 client intended to send too large body: 146392161 bytes, client: 192.168.0.101, server: virtualbox.myserver.com, request: "POST /9845_mysqladmin22802/import.php
I've updated phpmyadmin.sh to configure your phpmyadmin Nginx SSL vhost at /usr/local/nginx/conf/conf.d/phpmyadmin_ssl.conf with a higher client body size limit at 512MB and time out value at 1800 seconds:
 client_body_buffer_size 256k;
 client_body_timeout 1800s;
 client_header_buffer_size 256k;
## how long a connection has to complete sending
## it's headers for request to be processed
 client_header_timeout  60s;
 client_max_body_size 512m;
 connection_pool_size  512;
 directio  512m;
 ignore_invalid_headers on;
 large_client_header_buffers 8 256k;
If you intend to change /usr/local/nginx/conf/conf.d/phpmyadmin_ssl.conf settings, be sure to restart Nginx server for changes to take affect.
service nginx restart
or command shortcut
ngxrestart
Important Notes
MySQL database backup and restore
The updated phpmyadmin.sh script also raised some of the default timeout values for phpmyadmin SSL vhost, dedicated php-fpm pool and php includes files to around 1800 seconds to lower frequency of encounting 502 gateway timeout errors. These may occur if you are trying to backup or restore large MySQL databases or tables and phpmyadmin times out.
However, for large MySQL databases, you should never rely on phpmyadmin to backup and restore databases as phpmyadmin is not reliably and can timeout resulting in incomplete or corrupted database backups. It's another reason, I didn't include phpmyadmin by default in Centmin Mod as it provides a false sense of reliability if folks rely on phpmyadmin for backing up their databases or trying to restore their databases.
The only reliable method of back and restore of databases is via MySQL command line with mysqldump. Bottom of page at http://centmin.com/mysql.html has an example for backup and restore of a MySQL database using mysqldump and mysql command lines within SSH telnet.
backup
mysqldump -u mysqlusername -p mysqldatabasename > /path/to/mysqldatabasename_backup_date.sql
restore
mysql -u mysqlusername -p mysqldatabasename < /path/to/mysqldatabasename_backup_date.sql


