Migrating From HTTP to HTTP/2 based HTTPS With Letsencrypt SSL Certificates
The below guide will show you step by step how to migrate your existing Centmin Mod Nginx HTTP based web site's Vhost configuration and switch to Nginx HTTP/2 based HTTPS site using free Letsencrypt SSL certificates obtained via Centmin Mod's 123.09beta01 branch's new addon/acmetool.sh Addon and it's underlying third party Letsencrypt client, acme.sh.
The Centmin Mod 123.09beta01 branch's new addon/acmetool.sh tool can also automate the conversion for fresh new Nginx vhost sites but since the new addon is still in beta testing it may not be the best option for existing Centmin Mod Nginx hosted Vhost sites using HTTP (non-HTTPS) configurations. The below outlined steps are the manual method which allows better control over the migration to Nginx HTTP/2 based HTTPS Vhost configuration. If you are looking at a fresh Nginx HTTPS vhost site creation with Letsencrypt SSL certificates, check out the alternate guide here.
Nginx HTTP/2 HTTPS Setup
The below steps assume the following:
- Your intended domain name (and www version) has a valid working DNS A record entry pointing to the server's IP address. If using Cloudflare and your Centmin Mod Nginx server doesn't have IPv6 networking enabled or if you have disabled IPv6 networking, you will also need to enable Cloudflare Pseudo IPv4 compatibility option outlined here and set it to overwrite headers.
- That you have already installed Centmin Mod 123.09beta01 branch LEMP stack via the auto installer to setup a Nginx 1.13.x, PHP 5.6, MariaDB 10.1 MySQL server on CentOS 6 or 7 server.
- That you have previously added your HTTP based domain via
centmin.sh menu option 2orcentmin.sh menu option 22ornv command lineas outlined here.
If you have any questions or issues, ask on the Community forums.
step 1.
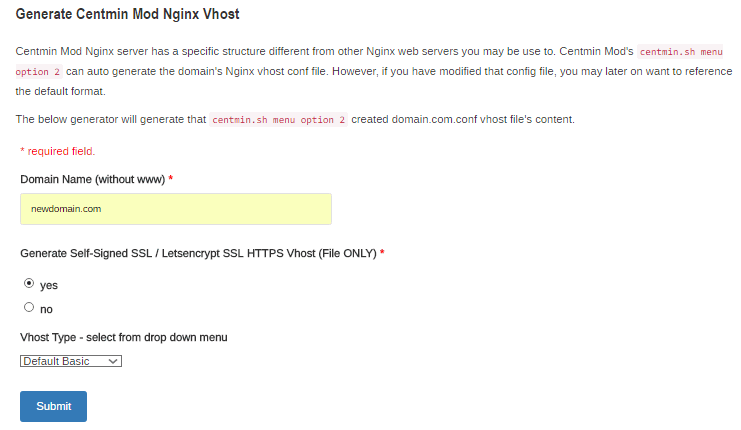
Use the official site Nginx Vhost generator to check the Generate Self-Signed SSL / Letsencrypt SSL HTTPS Vhost checkbox and fill in on the domain input form the desired domain name you want to migrate or setup Nginx HTTP/2 based HTTPS Vhost. I'll be using the example domain, newdomain.com throughout this guide. The for Vhost Type drop down menu select the appropriate Vhost template. For this example the Default Basic Vhost template is chosen. Then hit submit. You'll be greeted with the full manual instructions to setup the Centmin Mod Nginx HTTP/2 HTTPS Vhost with Letsenecrypt SSL certificates. The rest of the steps below are just highlighting these outputted full manual instructions.
Example from official site Nginx Vhost generator
step 2.
Full manual instructions outline both steps for self-signed SSL certificates and Letsencrypt SSL certificates setup. For the purpose of this guide, we'll look at Letsencrypt SSL certificate setup. So first step is to setup the directory /usr/local/nginx/conf/ssl/newdomain.com to store your Letsencrypt SSL certificate and generate a /usr/local/nginx/conf/ssl/newdomain.com/dhparam.pem file. In SSH client as root user, type the following commands. The openssl dhparam command can take a few minutes to complete.
mkdir -p /usr/local/nginx/conf/ssl/newdomain.com
cd /usr/local/nginx/conf/ssl/newdomain.com
openssl dhparam -out dhparam.pem 2048
step 3.
Next step for Letencrypt SSL certificate setup is to install addons/acmetool.sh and run addons/acmetool.sh acmeupdate command to install the third party Letsencrypt client, acme.sh.
addons/acmetool.sh is disabled by default in Centmin Mod 123.09beta01 branch as it's still being beta tested. So to enable it you need to set a variable LETSENCRYPT_DETECT='Y' in Centmin Mod's persistent config file /etc/centminmod/custom_config.inc. The below commands, creates the /etc/centminmod/custom_config.inc file if it doesn't exist and echo inserts the variable into /etc/centminmod/custom_config.inc file and then final command runs addons/acmetool.sh acmeupdate command to install acme.sh.
touch /etc/centminmod/custom_config.inc
echo "LETSENCRYPT_DETECT='y'" >> /etc/centminmod/custom_config.inc
/usr/local/src/centminmod/addons/acmetool.sh acmeupdate
step 4.
Now that acme.sh client is installed, you can run this directly to obtain a Letsencrypt SSL certificate with 90 day expiry which will via a cronjob auto renewal every 60 days.
In your SSH client as root user, type the following two single line commands which pertain to newdomain.com. If you are using a subdomain, you can remove the 2nd instance of -d www.newdomain.com. You may need to horizontally scroll to copy and paste this single line.
This command uses acme.sh client to use --force --issue with 60 day auto renewal options and verify your domain name with Letsencrypt's servers and once validated will obtain a Letsencrypt SSL certificate for you. The obtained free Letsencrypt SSL certificate and private key etc are stored at /root/.acme.sh/newdomain.com.
Note, if you're using a custom non-standard web root path different from the one outlined below at /home/nginx/domains/$vhostname/public change the custom web root path in below command.
/root/.acme.sh/acme.sh --force --issue --days 60 -d newdomain.com -d www.newdomain.com -w /home/nginx/domains/newdomain.com/public -k 2048 --useragent centminmod-centos-acmesh-webroot --log /root/centminlogs/acmetool.sh-debug-log-newdomain.com.log --log-level 2
This command uses acme.sh client with --installcert option to copy your Letsencrypt SSL certificates from directory at /root/.acme.sh/newdomain.com to the custom Centmin Mod Nginx directory we created in step 2 above at /usr/local/nginx/conf/ssl/newdomain.com.
/root/.acme.sh/acme.sh --installcert -d newdomain.com -d www.newdomain.com --certpath /usr/local/nginx/conf/ssl/newdomain.com/newdomain.com-acme.cer --keypath /usr/local/nginx/conf/ssl/newdomain.com/newdomain.com-acme.key --capath /usr/local/nginx/conf/ssl/newdomain.com/newdomain.com-acme.cer --reloadCmd /usr/bin/ngxreload --fullchainpath /usr/local/nginx/conf/ssl/newdomain.com/newdomain.com-fullchain-acme.key
End result is you should have your free Letsencrypt SSL certificates installed and copied to the following locations:
/usr/local/nginx/conf/ssl/newdomain.com/newdomain.com.crtis your Letsencrypt SSL certificate file/usr/local/nginx/conf/ssl/newdomain.com/newdomain.com.keyis your private key file linked to your Letsencrypt SSL certificate
step 5.
Setup /usr/local/nginx/conf/ssl_include.conf include file which has common Nginx HTTPS settings globally for all Nginx HTTPS Vhost sites. This file may already exist, otherwise create it with the contents below:
ssl_session_cache      shared:SSL:10m;
ssl_session_timeout    60m;
ssl_protocols  TLSv1 TLSv1.1 TLSv1.2;
For Centmin Mod 123.09beta01 with Nginx and OpenSSL 1.1.1 default, enable TLSv1.3 too in /usr/local/nginx/conf/ssl_include.conf with following contents:
ssl_session_cache      shared:SSL:10m;
ssl_session_timeout    60m;
ssl_protocols  TLSv1 TLSv1.1 TLSv1.2 TLSv1.3;
To verify if the file exists you can cat output the file's contents. If the file doesn't exist an error will mention such:
cat /usr/local/nginx/conf/ssl_include.conf
step 6.
Next is to setup the Nginx HTTP/2 HTTPS Vhost config file at /usr/local/nginx/conf/conf.d/newdomain.com.ssl.conf. Create the file with the following contents:
# Centmin Mod Getting Started Guide
# must read http://centmin.com/getstarted.html
# For HTTP/2 SSL Setup
# read http://centmin.com/nginx_configure_https_ssl_spdy.html

# redirect from www to non-www  forced SSL
# uncomment, save file and restart Nginx to enable
# if unsure use return 302 before using return 301
# server {
#   server_name newdomain.com www.newdomain.com;
#    return 302 https://newdomain.com$request_uri;
# }

server {
  listen 443 ssl http2;
  server_name newdomain.com www.newdomain.com;

  ssl_dhparam /usr/local/nginx/conf/ssl/newdomain.com/dhparam.pem;
  ssl_certificate      /usr/local/nginx/conf/ssl/newdomain.com/newdomain.com-acme.cer;
  ssl_certificate_key  /usr/local/nginx/conf/ssl/newdomain.com/newdomain.com-acme.key;
  include /usr/local/nginx/conf/ssl_include.conf;

  http2_max_field_size 16k;
  http2_max_header_size 32k;
  # dual cert supported ssl ciphers
  ssl_ciphers TLS13-AES-128-GCM-SHA256:TLS13-AES-256-GCM-SHA384:TLS13-CHACHA20-POLY1305-SHA256:TLS13-AES-128-CCM-8-SHA256:TLS13-AES-128-CCM-SHA256:ECDHE-ECDSA-AES128-GCM-SHA256:ECDHE-RSA-AES128-GCM-SHA256:ECDHE-ECDSA-AES256-GCM-SHA384:ECDHE-RSA-AES256-GCM-SHA384:ECDHE-ECDSA-CHACHA20-POLY1305:ECDHE-RSA-CHACHA20-POLY1305:DHE-RSA-AES128-GCM-SHA256:DHE-RSA-AES256-GCM-SHA384:ECDHE-ECDSA-AES128-SHA256:ECDHE-RSA-AES128-SHA256:ECDHE-ECDSA-AES128-SHA:ECDHE-RSA-AES256-SHA384:ECDHE-RSA-AES128-SHA:ECDHE-ECDSA-AES256-SHA384:ECDHE-ECDSA-AES256-SHA:ECDHE-RSA-AES256-SHA:DHE-RSA-AES128-SHA256:DHE-RSA-AES128-SHA:DHE-RSA-AES256-SHA256:DHE-RSA-AES256-SHA:ECDHE-ECDSA-DES-CBC3-SHA:ECDHE-RSA-DES-CBC3-SHA:EDH-RSA-DES-CBC3-SHA:AES128-GCM-SHA256:AES256-GCM-SHA384:AES128-SHA256:AES256-SHA256:AES128-SHA:AES256-SHA:DES-CBC3-SHA:!DSS;
  ssl_prefer_server_ciphers   on;
  #add_header Alternate-Protocol  443:npn-spdy/3;
  #add_header Strict-Transport-Security "max-age=31536000; includeSubdomains;";
  #add_header X-Frame-Options SAMEORIGIN;
  #add_header X-Xss-Protection "1; mode=block" always;
  #add_header X-Content-Type-Options "nosniff" always;
  #spdy_headers_comp 5;
  ssl_buffer_size 1369;
  ssl_session_tickets on;

  # enable ocsp stapling
  resolver 8.8.8.8 8.8.4.4 valid=10m;
  resolver_timeout 10s;
  ssl_stapling on;
  ssl_stapling_verify on;
  ssl_trusted_certificate /usr/local/nginx/conf/ssl/newdomain.com/newdomain.com-acme.cer;

# ngx_pagespeed & ngx_pagespeed handler
#include /usr/local/nginx/conf/pagespeed.conf;
#include /usr/local/nginx/conf/pagespeedhandler.conf;
#include /usr/local/nginx/conf/pagespeedstatslog.conf;

  # limit_conn limit_per_ip 16;
  # ssi  on;

  access_log /home/nginx/domains/newdomain.com/log/access.log combined buffer=256k flush=5m;
  error_log /home/nginx/domains/newdomain.com/log/error.log;

  root /home/nginx/domains/newdomain.com/public;

  location / {

# block common exploits, sql injections etc
#include /usr/local/nginx/conf/block.conf;

  # Enables directory listings when index file not found
  #autoindex  on;

  # Shows file listing times as local time
  #autoindex_localtime on;

  # Enable for vBulletin usage WITHOUT vbSEO installed
  # More example Nginx vhost configurations at
  # http://centmin.com/nginx_configure.html
  #try_files    $uri $uri/ /index.php;

  }

  include /usr/local/nginx/conf/staticfiles.conf;
  include /usr/local/nginx/conf/php.conf;
  include /usr/local/nginx/conf/drop.conf;
  #include /usr/local/nginx/conf/errorpage.conf;
  include /usr/local/nginx/conf/vts_server.conf;
}
Then restart Nginx and PHP-FPM servers
nprestart
step 7.
Now you will have two Nginx vhost config files and need to decide what to do with your site default - either allow HTTP + HTTPS or redirect HTTP to HTTPS and default to HTTPS based site.
- HTTP existing one at
/usr/local/nginx/conf/conf.d/newdomain.com.conf - New HTTP/2 HTTPS one you created from above steps at
/usr/local/nginx/conf/conf.d/newdomain.com.ssl.conf
If you want to allow HTTP + HTTPS, then you're already set and just need to duplicate your custom location context and rewrite settings from /usr/local/nginx/conf/conf.d/newdomain.com.conf to /usr/local/nginx/conf/conf.d/newdomain.com.ssl.conf.
However, if you want to redirect HTTP requests to HTTPS and force HTTPS as default, you still have step 8 to complete as well as just need to duplicate your custom location context and rewrite settings from /usr/local/nginx/conf/conf.d/newdomain.com.conf to /usr/local/nginx/conf/conf.d/newdomain.com.ssl.conf.
step 8.
To redirect all HTTP requests to HTTPS and force HTTPS as default, you have a few more steps to do as outlined here and to just need to duplicate your custom location context and rewrite settings from /usr/local/nginx/conf/conf.d/newdomain.com.conf to /usr/local/nginx/conf/conf.d/newdomain.com.ssl.conf.
Disable HTTP Nginx Vhost at /usr/local/nginx/conf/conf.d/newdomain.com.conf as you no longer need to edit or use it
mv /usr/local/nginx/conf/conf.d/newdomain.com.conf /usr/local/nginx/conf/conf.d/newdomain.com.conf-disabled
Edit the top of the /usr/local/nginx/conf/conf.d/newdomain.com.ssl.conf config file add a new server {} context above the HTTP/2 SSL server {} context and change it.
from
# Centmin Mod Getting Started Guide
# must read http://centmin.com/getstarted.html
# For HTTP/2 SSL Setup
# read http://centmin.com/nginx_configure_https_ssl_spdy.html

# redirect from www to non-www  forced SSL
# uncomment, save file and restart Nginx to enable
# if unsure use return 302 before using return 301
# server {
#   server_name newdomain.com www.newdomain.com;
#    return 302 https://$server_name$request_uri;
# }
to (for redirecting http://newdomain.com and http://www.newdomain.com to https://newdomain.com)
# Centmin Mod Getting Started Guide
# must read http://centmin.com/getstarted.html
# For HTTP/2 SSL Setup
# read http://centmin.com/nginx_configure_https_ssl_spdy.html

# redirect from www to non-www  forced SSL
# uncomment, save file and restart Nginx to enable
# if unsure use return 302 before using return 301
 server {
    server_name newdomain.com www.newdomain.com;
    return 302 https://newdomain.com$request_uri;
 }
Then restart Nginx and PHP-FPM servers
nprestart
The resulting Nginx Vhost file /usr/local/nginx/conf/conf.d/newdomain.com.ssl.conf for HTTP/2 HTTPS configuration at will look something like this:
# Centmin Mod Getting Started Guide
# must read http://centmin.com/getstarted.html
# For HTTP/2 SSL Setup
# read http://centmin.com/nginx_configure_https_ssl_spdy.html

# redirect from www to non-www  forced SSL
# uncomment, save file and restart Nginx to enable
# if unsure use return 302 before using return 301
 server {
   server_name newdomain.com www.newdomain.com;
    return 302 https://newdomain.com$request_uri;
 }

server {
  listen 443 ssl http2;
  server_name newdomain.com www.newdomain.com;

  ssl_dhparam /usr/local/nginx/conf/ssl/newdomain.com/dhparam.pem;
  ssl_certificate      /usr/local/nginx/conf/ssl/newdomain.com/newdomain.com-acme.cer;
  ssl_certificate_key  /usr/local/nginx/conf/ssl/newdomain.com/newdomain.com-acme.key;
  include /usr/local/nginx/conf/ssl_include.conf;

  http2_max_field_size 16k;
  http2_max_header_size 32k;
  # dual cert supported ssl ciphers
  ssl_ciphers TLS13-AES-128-GCM-SHA256:TLS13-AES-256-GCM-SHA384:TLS13-CHACHA20-POLY1305-SHA256:TLS13-AES-128-CCM-8-SHA256:TLS13-AES-128-CCM-SHA256:ECDHE-ECDSA-AES128-GCM-SHA256:ECDHE-RSA-AES128-GCM-SHA256:ECDHE-ECDSA-AES256-GCM-SHA384:ECDHE-RSA-AES256-GCM-SHA384:ECDHE-ECDSA-CHACHA20-POLY1305:ECDHE-RSA-CHACHA20-POLY1305:DHE-RSA-AES128-GCM-SHA256:DHE-RSA-AES256-GCM-SHA384:ECDHE-ECDSA-AES128-SHA256:ECDHE-RSA-AES128-SHA256:ECDHE-ECDSA-AES128-SHA:ECDHE-RSA-AES256-SHA384:ECDHE-RSA-AES128-SHA:ECDHE-ECDSA-AES256-SHA384:ECDHE-ECDSA-AES256-SHA:ECDHE-RSA-AES256-SHA:DHE-RSA-AES128-SHA256:DHE-RSA-AES128-SHA:DHE-RSA-AES256-SHA256:DHE-RSA-AES256-SHA:ECDHE-ECDSA-DES-CBC3-SHA:ECDHE-RSA-DES-CBC3-SHA:EDH-RSA-DES-CBC3-SHA:AES128-GCM-SHA256:AES256-GCM-SHA384:AES128-SHA256:AES256-SHA256:AES128-SHA:AES256-SHA:DES-CBC3-SHA:!DSS;
  ssl_prefer_server_ciphers   on;
  #add_header Alternate-Protocol  443:npn-spdy/3;
  #add_header Strict-Transport-Security "max-age=31536000; includeSubdomains;";
  #add_header X-Frame-Options SAMEORIGIN;
  #add_header X-Xss-Protection "1; mode=block" always;
  #add_header X-Content-Type-Options "nosniff" always;
  #spdy_headers_comp 5;
  ssl_buffer_size 1369;
  ssl_session_tickets on;

  # enable ocsp stapling
  resolver 8.8.8.8 8.8.4.4 valid=10m;
  resolver_timeout 10s;
  ssl_stapling on;
  ssl_stapling_verify on;
  ssl_trusted_certificate /usr/local/nginx/conf/ssl/newdomain.com/newdomain.com-acme.cer;

# ngx_pagespeed & ngx_pagespeed handler
#include /usr/local/nginx/conf/pagespeed.conf;
#include /usr/local/nginx/conf/pagespeedhandler.conf;
#include /usr/local/nginx/conf/pagespeedstatslog.conf;

  # limit_conn limit_per_ip 16;
  # ssi  on;

  access_log /home/nginx/domains/newdomain.com/log/access.log combined buffer=256k flush=5m;
  error_log /home/nginx/domains/newdomain.com/log/error.log;

  root /home/nginx/domains/newdomain.com/public;

  location / {

# block common exploits, sql injections etc
#include /usr/local/nginx/conf/block.conf;

  # Enables directory listings when index file not found
  #autoindex  on;

  # Shows file listing times as local time
  #autoindex_localtime on;

  # Enable for vBulletin usage WITHOUT vbSEO installed
  # More example Nginx vhost configurations at
  # http://centmin.com/nginx_configure.html
  #try_files    $uri $uri/ /index.php;

  }

  include /usr/local/nginx/conf/staticfiles.conf;
  include /usr/local/nginx/conf/php.conf;
  include /usr/local/nginx/conf/drop.conf;
  #include /usr/local/nginx/conf/errorpage.conf;
  include /usr/local/nginx/conf/vts_server.conf;
}
Then restart Nginx and PHP-FPM servers
nprestart
step 9.
Once you're comfortable with a working Nginx HTTP/2 setup, you can look at enabling HTTP Strict Transport Security (HSTS) which tells revisiting visitor's web browsers that you want to force HTTPS as default on future visits for as long as the max-age value in seconds.
If SSL certificate covers subdomains use the following add_header line in your Nginx HTTP/2 HTTPS Vhost file at /usr/local/nginx/conf/conf.d/newdomain.com.ssl.conf. Note, this applies to all subdomains even ones not on the server. So if you have subdomainABC.newdomain.com on another server that is non-HTTPS based, but the visitor visits newdomain.com first, the browser has cached HSTS so tells visitor's browser, next visit on any subdomains, also force HTTPS when visiting subdomainABC.newdomain.com. If you do not want that behaviour, use the second example without includeSubdomains;.
add_header Strict-Transport-Security "max-age=31536000; includeSubdomains;";
If SSL certificate DOES NOT cover subdomains use the folling in your Nginx HTTP/2 HTTPS Vhost file at /usr/local/nginx/conf/conf.d/newdomain.com.ssl.conf
add_header Strict-Transport-Security "max-age=31536000;";
Existing HTTPS Vhost template for /usr/local/nginx/conf/conf.d/newdomain.com.ssl.conf above has this commented out with a hash # in front so edit as needed:
#add_header Strict-Transport-Security "max-age=31536000; includeSubdomains;";
Then restart Nginx and PHP-FPM servers
nprestart
step 10.
Finally, to test your HTTP/2 HTTPS SSL setup, use the following online test sites to make sure all is setup and configured properly: